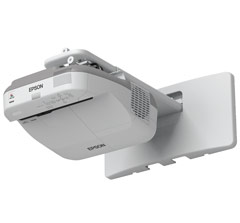
Thursday, October 27, 2016

Interactive Touch Panel versus Interactive Projector


Over the last five years’ interactive projectors have been taking over from the IWB/Projector combination. With the dual pen Epson 585Wi and the multi touch Epson 595Wi, it has never been cheaper to add an interactive display solution or replace an old one in a classroom at around $3000 fully installed, including SMART Notebook15 software and a usual image size of 90”.


But what about LCD touch screens? The price of these interactive panels have come down to the same price as the original IWB/Projector combo.

So which should you choose for your classrooms? It depends on a range of factors and each school and each classroom will have different requirements that will favour one product over another. Here are a couple of things to consider.

LCD panels are generally brighter, have higher contrast and higher resolution. LCD Panels have a longer lamp time of over 50, 000 hours and an expected working life of between 5 and 10 years. They are also around twice the price of a projector at a smaller display size of 55” to 70” diagonally. To give you an idea on size the small IWB’s installed in schools were around 78”

Size is really important. We have worked with a school who put in 55” LCD panels through another supplier. They are now replacing them with interactive projectors because the LCD screens were too small for students to see text and graphics. A costly mistake, especially when they had to make special secure cupboards as the screens were a targeted by thieves when they were first installed.

The current minimum recommended size for a LCD panel in a standard classroom is 65” with a recommended size of 70” to 80”.

Another thing to consider is installation. Both of these options require a decent structure to install on. An interactive projector is around 22kgs including the mount. An interactive touch panels can be up to 55kg for a 70” version plus whatever mounting system you choose, so some walls will have to be braced. In some classrooms your only option is a trolley.

When upgrading your interactive technology look at all your options as well as the physical limitations of each solution. You may find each classroom will have a different solution.


All prices approximate.

Feature
Epson Interactive projector
Viewsonic Interactive panel
Cost
@$1800 - $2300 plus install. Includes wall mount.
Minimum $3500 for 55” up to @$10,000 for 80” – minimum recommended size is 65” when used as a whiteboard at the front of a room.
Does not include wall mount or trolley.
Display Size
Up to 100”
Up to 80”
Weight
22kg
Up to 60kg
Height adjustable stand
Yes - @$2000
Yes - @$1500
Lamp costs
$80 – expected life around 5000hrs
NA – expected life of LCD 20,000hrs +
Expected life of the unit
5 years
10 years
Touch points
2 (585Wi – pen only)
5 (595Wi – pen and touch)
5 touch plus 5 for gesture
Shipping
Lower than LCD panel due to weight
Higher than projector due to weight
Software
Smart Notebook15, Easy Interactive tools 4.11
Viewboard lite, Viewboard 2.11
*note: Easy Interactive Tools can be downloaded and used.
*note: SmartNotebook15 can be purchased or subscription for Smart Notebook16 purchased
Networkable
yes
yes
Wireless
Optional
Optional
Apple TV compatible. * AppleTV purchased separately.
Yes
yes
Stand-alone mode
Basic, no saving or printing, single whiteboard only. (Epson 585Wi and 595Wi)
Basic features, multiple boards, can save and print. Access to document viewer software and basic internet browser
Warranty
3 years return to base
·        Can be upgraded to 4 years
4 years on site
·        Can be upgraded to 5 years


Thursday, September 15, 2016

Escape the room for Education - in a box. An awesome open source project for STE(A)M.

Recently my friends and I went to an "Escape the Room" venue. We had a blast and it got me thinking - this would be awesome in a classroom.

"Escape the Room" games are a preset number puzzles that a group of people have to solve to ta da! Escape the room.

Think "Myst" or any of the Text based adventure games (eaten by a gru!!!), and there are plenty of mobile and web based ones out there as well - Except this is real. with real locks, puzzles that you have to manipulate, tools that you find in one part of the game have to be used for another.

These venues are all themed to each escape scenario - in the one I went to it was themed as a lab, with a desk, filing cabinet, xray viewer, secure sample box, then the next room that you got into (after solving certain puzzles- a magnetic lock opened a secret door) was like a industrial basement with pipes and grating. and more puzzles to solve to finally get out. Lots of micro controller usage with magnetic locks, LED displays, relays to turn on a black light when you completed a puzzle to reveal another clue, hall effect switches as well as physical locks.

It was really challenging, but we all had to work together and solve each puzzle, so it was collaborative and fun. It taught perseverance and the timer on the wall gave the whole thing a sense of urgency. Yes we got out with 7 mins to spare.

My thinking was there must be a way to integrate this into classroom teaching without the expense or effort to set up a themed room or two for each game...

I wasn't alone. Someone has already done the hard work... and it is open source (free)

http://www.breakoutedu.com/

It's a real world puzzle platform you can use to run free pre-made games for your students, plus a template to make your own. It can integrate both real world and ICT puzzles via website, QR codes or images.

You either buy the "box" of locks or make your own according to the specifications. There is also a low cost Lock app that you can use to create virtual locks.

There is a big element of STE(A)M with this and you could extend the puzzles with arduino or probably more beneficial - get the students to create their own scenarios and puzzles.

Anyway - if you were looking to do something cool with your middle schoolers at the end of the year - this is not a bad option.

Friday, September 9, 2016

Common Use Issues with the Epson 575Wi, 585Wi and 595Wi - Calibration issues and PC Free mode.

I just sent an email to one of my clients, and it seems I repeat this quite a lot when the Epson interactive projectors have been installed and I'm going out a for a service call. So I might as well put this on my blog so I can just refer it to them. It might also help anyone else who is having these issues as they seem to be universal in my part of the world.


2 biggest issues people run into with these projectors when working with the interactive functions.

1>    This projector has 2 modes of operation PC Interactive & PC free
a.      PC interactive is where the interactivity is connected with your computer, what you do on the projection is mirrored on your laptop or desktop. You can use your computer like a giant touch screen opening and closing programs, navigating websites. The stylus is your mouse.
                                                    i.     N.B. The USB CABLE MUST be connected between the projector and the computer for this to work
b.      PC free. This is where the computer and the projector are separated – you can write and draw over the screen but you can’t interact with it. You also can’t save your annotations.
                                                    i.     If the computer is connected to the projector – you will still see the screen – you just won’t be able to Interact with it. A good way to check is to draw something on the projection then compare your projection with the laptop or desktop screen – if they DON’T MATCH then you are in PC Free.
c.      To change modes touch near the edge of the screen and these two icons appear – a projector with a pen and a mouse with a laptop. The one with the orange highlight around is the mode that is in use. Toggling between the modes will show a 2 second on screen notification of what mode it is in.
                                                    i.     For most purposes in schools you need to be in PC interactive mode so you can use software like Smart Notebook, Easy Interactive Tools or any other software on your computer.

2>    This is a WXGA projector series – that means it is a wide screen projector and needs to be fed with the appropriate resolution. So you may go through the calibration procedure, but you still have issues in PC interactive mode. Switch to PC Free mode and the calibration is fine
a.      The calibration will be “out” if you are not set to a WXGA resolution on your computer – this usually looks like it is OK in the centre of the screen but as you move the pen out to the top and bottom of the screen it gets progressively out of sync.
                                                    i.     Set your resolution on your computer to a 16:10 ratio like 1280x800


I hope this helps.